In this installment, I will be going over how I set up my external storage to Kubernetes for persistent storage. As with any container platform, the containers are meant to be stateless and do not store data inside the container. So if there is persistent data needed, it needs to be stored externally.
As mentioned in my first post, my book of reference to learn Kubernetes did touch on storage, but does limit it to cloud providers. Which wasn’t as helpful for me, because, of course, in the spirit of Homelab we want to self-host! Luckily there are some great projects out there that we can utilize!
I use TrueNAS core for my bulk data and VM-based iSCSI storage. I was pleasantly surprised to find that TrueNAS does support Container Storage Interface (CSI), so I cover this method below.
Installing CSI plugin
I found this great project, democratic-csi. The readme has great steps and examples using TrueNAS, so I will not duplicate here for the sake of simply re-writing the documentation. I am personally using NFS for storage as it seemed more straight forward and with iSCSI it for my back end of all my VM storage from Proxmox. I would rather not modify that config extensively to risk that setup for such an import piece of the lab.
First, I configured TrueNAS with the necessary SSH/API and NFS settings and ran the helm install:
helm upgrade --install --create-namespace --values freenas-nfs.yaml --namespace democratic-csi zfs-nfs democratic-csi/democratic-csiMy example freenas-nfs.yaml file is below:
csiDriver:
  name: "org.democratic-csi.nfs"

storageClasses:
- name: freenas-nfs-csi
  defaultClass: false
  reclaimPolicy: Retain
  volumeBindingMode: Immediate
  allowVolumeExpansion: true
  parameters:
    fsType: nfs

  mountOptions:
  - noatime
  - nfsvers=4
  secrets:
    provisioner-secret:
    controller-publish-secret:
    node-stage-secret:
    node-publish-secret:
    controller-expand-secret:

driver:
  config:
    driver: freenas-nfs
    instance_id:
    httpConnection:
      protocol: http
      host: 192.168.19.3
      port: 80
      # This is the API key that we generated previously
      apiKey: 1-KEY HERE
      username: k8stg
      allowInsecure: true
      apiVersion: 2
    sshConnection:
      host: 192.168.19.3
      port: 22
      username: root
      # This is the SSH key that we generated for passwordless authentication
      privateKey: |
        -----BEGIN OPENSSH PRIVATE KEY-----
        KEY HERE
        -----END OPENSSH PRIVATE KEY-----
    zfs:
      # Make sure to use the storage pool that was created previously
      datasetParentName: ZFS_POOL/k8-hdd-storage/vols
      detachedSnapshotsDatasetParentName: ZFS_POOL/k8-hdd-storage/snaps
      datasetEnableQuotas: true
      datasetEnableReservation: false
      datasetPermissionsMode: "0777"
      datasetPermissionsUser: root
      datasetPermissionsGroup: wheel
    nfs:
      shareHost: 192.168.19.3
      shareAlldirs: false
      shareAllowedHosts: []
      shareAllowedNetworks: []
      shareMaprootUser: root
      shareMaprootGroup: wheel
      shareMapallUser: ""
      shareMapallGroup: ""
The above file, I felt, is very well-documented from the package maintainers. I had to input API/SSH keys, and the import piece is the dataset information:
datasetParentName: ZFS_POOL/k8-hdd-storage/vols AND
detachedSnapshotsDatasetParentName: ZFS_POOL/k8-hdd-storage/snaps
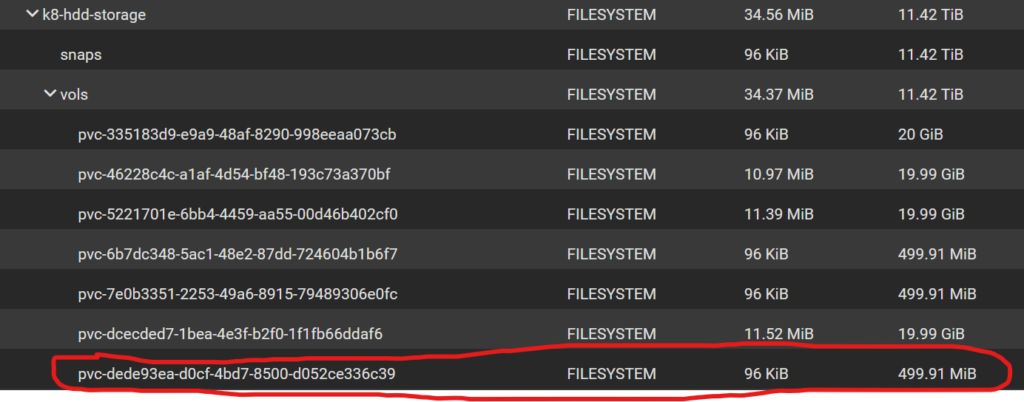
This was dependent on what I had setup in TrueNAS. My pool that looks like this:

Testing Storage
With the helm command run, I saw a “Storage Class” created in Kubernetes:

The name comes from the yaml file above. The Kubernetes Storage class is the foundation, and its job is to help automate the storage setup from containers that request storage. These all have specific names like Persistent Volume Claims and Persistent Volumes, which I will get to. The Storage class essentially uses a CSI plugin (which is API) to talk to external storage systems to provision storage automatically. This way Kubernetes has a consistent way to create storage no matter the platform. It could be Azure/AWS/TrueNAS etc.
Now, to get to the interesting part: we can first create a “Persistent Volume Claim” (PVC). The PVC’s job is to organize requests to create new Persistent Volumes on Storage classes. This will hopefully help with an example:
cat create_pvc.yaml
apiVersion: v1
kind: PersistentVolumeClaim
metadata:
  name: nfs-pvc-test
  annotations:
    volume.beta.kubernetes.io/storage-class: "freenas-nfs-csi"
spec:
  storageClassName: freenas-nfs-test
  accessModes:
    - ReadWriteOnce
  resources:
    requests:
      storage: 500Mi
The above yaml file is essentially asking for 500Mb of storage from the storage class named “freenas-nfs-test”
I applied this with the normal “kubectl apply -f create_pvc.yaml”
With this applied, I saw it created, and once completed it was in a bound state:

Now to use this:
cat test-pv.yaml
apiVersion: v1
kind: Pod
metadata:
  name: volpod
spec:
  volumes:
  - name: data
    persistentVolumeClaim:
      claimName: nfs-pvc-test
  containers:
  - name: ubuntu-ctr
    image: ubuntu:latest
    command:
    - /bin/bash
    - "-c"
    - "sleep 60m"
    volumeMounts:
    - mountPath: /data
      name: data
In this pod, I referenced to create a volume with spec.volumes using the PVC name I created in the last step. Then under spec.containers.volumeMounts I give a mount directory inside the container to this directory.
In TrueNAS, at this point, I saw a volume created in the dataset that matches the volume ID displayed in Kubernetes

Attach to the pod:
kubectl exec -it volpod -- bashInside the container now, I navigated to the /data directory and created a test file:
root@volpod:/# cd /data/
root@volpod:/data# ls
root@volpod:/data# touch test.txt
root@volpod:/data# ls -l
total 1
-rw-r--r-- 1 root root 0 Nov  3 04:11 test.txt
Just to see this work in action, now SSHing into the TrueNAS server and browsing to the dataset, we can see the file!
freenas# pwd
/mnt/ZFS_POOL/k8-hdd-storage/vols/pvc-dede93ea-d0cf-4bd7-8500-d052ce336c39
freenas# ls -l
total 1
-rw-r--r--  1 root  wheel  0 Nov  3 00:11 test.txt
In the next installment, I will go over how I created my container images. My initial idea was to use Librespeed and a second container with mysql for results persistent storage. So having the above completed gives a starting point for any persistent data storage needs!